Triggers are database objects which are needed to perform some predefined action for automatic execution whenever users try to do execute data modification commands (INSERT, DELETE and UPDATE) on the specified tables. Triggers are helpful since it can help in maintaining the integrity of the data in database tables but they also hard to maintain as are difficult to find. Since they executed on every Insert/delete/update command on the table, they can slow down the performance. This article will discuss the advantages & disadvantages of SQL Trigger as it will help you in deciding whether to define the SQL Trigger or not.
1) It helps in maintaining the integrity constraints in the database tables, especially when the primary key and foreign key constrain are not defined.
2) It sometimes also helps in keeping the SQL codes short and simple as I show in the real-life example.
3) It helps in maintaining the track of all the changes (update, deletion and insertion) occurs in the tables through inserting the changes values in the audits tables.
4) Sometimes if the code is not well managed, then it can help in maintaining the database constraints defined on the tables on which the trigger is defined. For example, suppose if have a situation that there is an online learning system in which a user can register in the multiple course.
Disadvantages of Triggers
1) Hard to maintain since this may be a possibility that the new developer doesn’t able to know about the trigger defined in the database and wonder how data is inserted, deleted or updated automatically.
2) They are hard to debug since they are difficult to view as compared to stored procedures, views, functions, etc.
3) Excessive or over use of triggers can slow down the performance of the application since if we defined the triggers in many tables then they kept automatically executing every time data is inserted, deleted or updated in the tables (based on the trigger’s definition) and it makes the processing very slow.
4) If complex code is written in the triggers, then it will slow down the performance of the applications.
5) The cost of creation of triggers can be more on the tables on which frequency of DML (insert, delete and update) operation like bulk insert is high.
Summary
This article tells about the various advantages and disadvantages of SQL Trigger. If you want more about SQL trigger , its various type & real world example of SQL trigger, you can read my article SQL Triggers – An Introduction.
If you want to read more SQL Concepts, you can find the list of all SQL articles in page SQL Tutorial
If you want to read more Azure SQL Concepts, you can find the list of all Azure SQL articles in page Azure Tutorial
Please don’t forget to gives your valuable comments for the article or you can send me the direct queries to my Email id askvivekjohari@gmail.com.
Migrating SQL Database to Azure SQL Database using SSMS Deploy
In the previous articles, we had introduction about the Azure SQL Database, Azure Service Tiers and pricing models, Creation of Azure SQL Database & How to connect with the Azure SQL Databases. Now, in next step, we will discuss about the SQL database migration from On Premise to Azure Portal. There are many ways for performing the migration. For Example
Using SQL Server Management Studio (SSMS) Deploy method
This article will tell about migrating SQL Database to Azure SQL Database using SSMS deploy as a Step by Step process. This Step by Step knowledge will going to help you in migrating the database from your On premise database server to the Azure portal.
SQL database migration to Azure SQL Database
We are using the SQL Server Management Studio 2016 for the database migration. In the below mentioned screenshot, we see that there are two server connected. Top Server is Azure SQL Server which we created in our previous article and the other Server is On Premise SQL Server. In this article, we are going to migrate SQL database AdventureWorks2012 from On premise to Azure Portal.
Figure 1- On Premises AdventureWorks2012 Database for Migrating to Azure
To start the process, select the On Premise database AdventureWorks2012 and right-click on it. From the different options list, select Tasks & then select Deploy Database to Microsoft Azure SQL Database.. as shown in below screenshot.
Figure 2- Choose Option Deploy Database to Microsoft Azure SQL Database…
Once you click on the option Deploy Database to Microsoft Azure SQL Database.., below Introductionscreen is comes.
Figure 3 – Introduction page for deploy database to Microsoft Azure SQL database
Click on the NextButton to reach the below screen.
Figure 4 – Connect to Azure Target Connection
In this screen, you need to connect to the destination Azure Server as shown in the below screenshot.
Figure 5 – Login into the Target Azure Connection
Once you connected with the destination Azure server, mentioned the new database name for Azure SQL Server. You can choose the same database name as in the On Premise SQL Server or you can change it. Here, base on the database size and other requirement, you can choose the service tier (as shown in below screen).
Figure 6 – Choose New database Name & choose Service Tier for New database
I have chosen the Basic Service Tier for this article. Now choose the folder location in which the backup file (.bacpac) will going to be saved. After that click on the NextButton.
Figure 7 – Choose backup file folder location
After clicking on the Next button, Summary screen comes where you can verify your specified settings. If setting is fine, click on Finishbutton.
Figure 8 – Verify the specified setting and click Finish
Once Finishbutton it clicked, it start deploying the SQL Database to the Azure SQL Server as shown in the below screen.
Figure 9 – Deploying database on Azure Platform
Oops. We got an error in the deployment process as shown in the below screenshot.
Figure – 10. Oops Got an Error
When I check for the error message online, I found that it comes since I using the SQL Server management Studio 2016. It is known issue and the resolution is to use the latest SSMS V17.6
Figure 11 – Information about my current SSMS 2016
So to resolve that issue, I download the SQL Server management Studio SSMS v17.6 and use it for the database migration process.
Figure 12 – SQL Server Management Studio V17.6
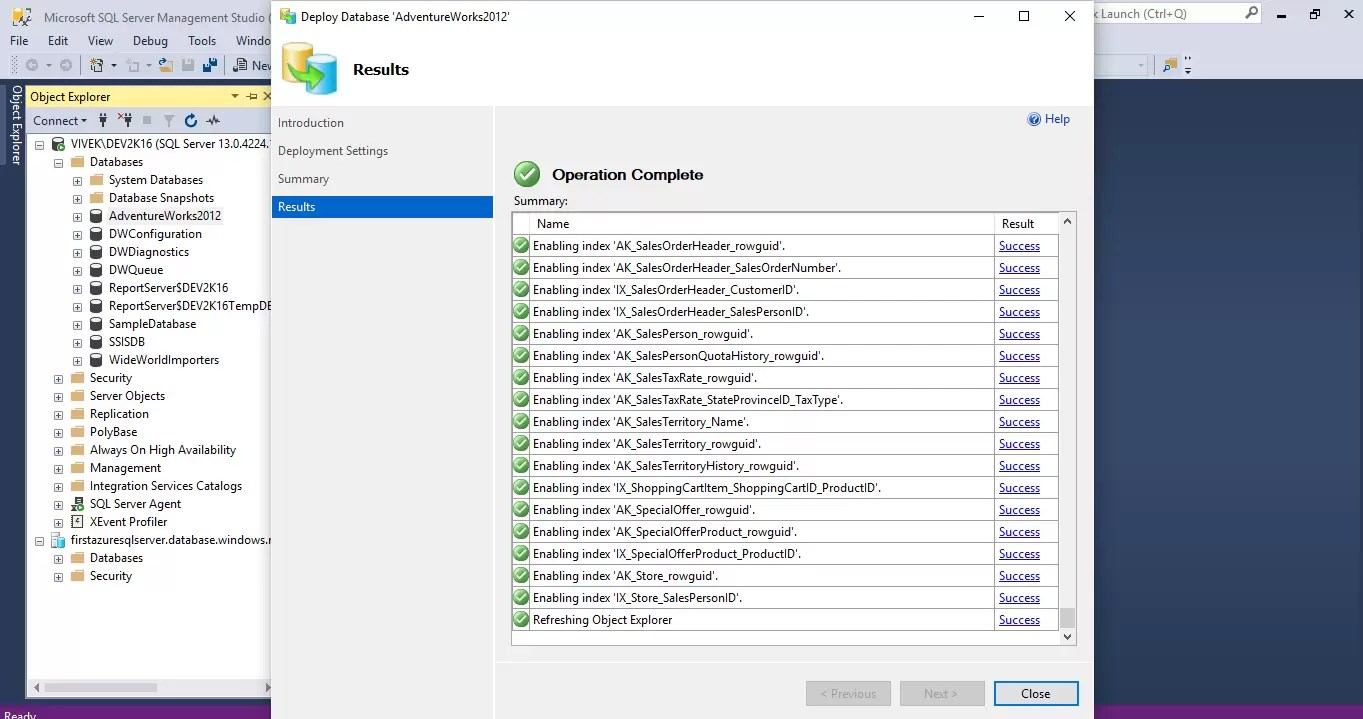
I perform the all the steps from the beginning (choosing On Premises database) till Summary page and click on the FinishButton. It again start the deployment process but this time completed without any error. Finally click on the CloseButton
Figure 13 – Migration to Azure portal is finally Successful
Since the Migration process of SQL database from On Premise SQL Server to Azure SQL server got completed successfully, let check on the Azure SQL Server. If we refresh the Azure SQL Server and expand the Databases node, we can see the Database on Azure SQL Server.
In the previous articles of Azure tutorial, we learn about Azure SQL database, various service tiers, Azure Database creation and how to connect with the Azure SQL Server. As next step, this article tell about migrating SQL Database to Azure SQL Database using SQL Server Management Studio (SSMS) deploy. In the next few articles, we are going to discuss other methods of SQL database migration to Azure Portal.
Please don’t forget to gives your valuable comments for the article or you can send me the direct queries to my Email id askvivekjohari@gmail.com
In the previous article Azure – Creating an Azure SQL Database, we discussed, how to create an Azure SQL Database. Now in this article, we will discuss about how to connect with Azure SQL database using SQL Server Management Studio (SSMS). The below screenshot shows the overview page of the SQL database AzureSQLDB which we have created in our last post.
Azure SQL Database Overview Screen
In this database overview page, you can see the field Server Name. This field information contains the connection string which we are going to use for connecting this database using SSMS. There is a copy icon which user can click to copy the server connection string as shown in the below screenshot.
Azure Database Connection String
Once Azure SQL Database connection string is copied, open the SQL Server Management Studio (SSMS) and in the server name field, paste it. Window authentication is not allowed in case of Azure SQL database. So we use the SQL authentication for connecting to Azure database in this article. In the Authentication field, choose SQL Server Authentication and in the login field, use the login of the Azure SQL Server Admin which we created while creating the Azure SQL Server in our last article. After that enter the password of the Azure SQL Server Admin.
SSMS Connection Page
In case of on premise SQL Server, we can connect to the SQL Server after clicking on the Connect button of the SSMS connection page. But in case of Azure SQL Server, we need to add IP Address in the firewall rule which allow us to connect to the Azure server. In this screen, we need to first sign in using the azure account credential as shown in next 3 screenshots.
Signing with Azure Account credentials for connecting Azure SQL Database
Enter the email of Azure Account
Enter your Azure Login
Enter the password of your Azure account
Enter your Azure Password
After signing into the Azure account, we need to add either a current IP address for accessing the Azure SQL Server or we can add a range of IP Address which can have access to the Azure SQL Server as shown in next 2 screenshots. Azure helps by picking the current IP address or range of the IP address of the machine using which user try to login into the Azure SQL Server.
Adding the Single IP Address into the Firewall Rule
Adding range of IP Address in Firewall Rule for accessing the Azure SQL Server
Once user select the IP address option, it needs to click Ok and then click on Connect button. It will connect the user with the Azure SQL Server through SSMS as shown in below screenshot.
Azure SQL Server Connected through SSMS
Once user connect to the Azure SQL Server using SSMS, it can see all the databases by clicking on the “+” icon against the Databases. By clicking on the + icon against the databases, we can see our database AzureSQLDB. It is highlighted in yellow color in the below screenshot.
Since AzureSQLDB is a blank database, so if we click on the “+” icon against the Tables, no user table will be found. This can be see in the below screenshot.
No user table is there as database is blank
We can execute the SQL queries against the Azure SQL database as we do in case of On Premise SQL Server database. For example, let select the database AzureSQLDB and click on the New Query option from the top menu. After that create a new table “testtable” on it & insert the data into the table using the Insert command. Now after inserting if we select the data from table, we got the record-set of the table as shown in the below screenshot.
Creating table & inserting data into the Azure SQL Database
If we again refresh the Tables node in the left hand side hierarchy, we can see the new table TestTable as highlighted in the below screenshot.
Newly created table visible under the table hierarchy in Azure SQL Database
Summary
In the previous article we learn how to create a SQL Database on Azure Portal. In this article we gives the Step by Step details of how to connect with Azure SQL Database. Images has been added at every step to make understanding of the concept easy and in a better way. In the next articles, we will discuss the differences between the On Premise SQL Server & Azure SQL Server. Also we will going to discuss different ways of migrating the SQL databases from the On Premise SQL Server to Azure portal.
Please don’t forget to gives your valuable comments for the article or you can send me the direct queries to my Email id askvivekjohari@gmail.com.
When we start migrating our database from SQL Server to Azure Database, we want to know what are the pricing models are offered by Azure and how do we know the correct Pricing model/Service Tier suitable for our database. This article will going to discuss about the pricing models offered by Azure and helps in choosing the correct Service Tier as per our database workload need.
There are 2 Pricing models offered by Azure database. Since DTUs based pricing model is currently in use and the V-Core Based Pricing model is under preview, so in this article we are going to discuss about how DTUs based pricing model work in Azure in & going to cover the following topics:-
1) DTUs based Pricing model
2) Service Tiers under DTUs based pricing model & its effect on Application Performance
2) What is DTU ?
3) calculating required DTUs using DTU Calculator
DTU Based Pricing model:-
What is DTU?
DTU or Database Transaction Unit can be defined as the blended measure of resources like memory, CPU, Data IO, Log IO guaranteed to be available to an Azure database at the specific performance level. It simply defined how powerful your Azure database is and used as the unit of comparison. Higher the DTUs higher the performance.
Example: –
For example, if 5 DTUs takes 100 seconds to executes 15 queries, then 100 DTUs will going to take 5 seconds time in solving these 15 queries.
Different Service Tiers in DTUs base pricing model:-
In DTUs base pricing model, Azure offers preconfigured bundle of computer resources & storage size for different level of application performance. Customers which like preconfigured bundle of resources & monthly payments, prefer DTUs base pricing model. In this pricing model, Azure database offers below mentioned 3 types of Service Tiers:-
Service Tiers in Azure
We can differentiate these 3 service tiers based on the below mention characteristics:-
Size – Size limit for an Azure Database
Performance – No. of DTUs available
Recovery – No. Of Days for performing Point In Time Recovery
Concurrency – No of Login attempts/Worker threads / Concurrent Sessions
Extra Features – No of Features available only in high-end services tiers like In-Memory OLTP & ColumnStore Indexes
ServiceTiers Characteristics - Summary
Basic
Standard
Premium
Maximum Storage Size
2 GB
1 TB
4 TB
Maximum DTUs
5
3000
4000
Point-In-Time Recovery
7 days
35 days
35 days
Login Attempts
30
60 - 200
200 - 6400
Worker Threads
30
60 - 200
200 - 6400
Sessions
300
600 - 2400
2400 - 32000
In Memory OLTP
N/A
N/A
Supported
Columnstore indexing
N/A
S3 and Above
Supported
Standard Service Tier Levels
With in Standard Service Tier, depending on the number of DTUs, we have various level starting from S0 to S12. It means higher the level, higher the DTUs and higher the performance
Standard Service Tier Levels
Levels
S0
S1
S2
S3
S4
S6
S7
S9
S12
DTUs
10
20
50
100
200
400
800
1600
3000
In Addition, in case of Standard Service Tier, if our database size goes beyond 250 GB then we need to pay money for the extra storage space we occupied as shown in the below image
Standard Service Tier Size Limit
Premium Service Tier Levels
Also in Premium Service Tier, depending on the number of DTUs, we have various level starting from P1 to P15 which are mentioned below
Premium Service Tier Levels
Levels
P1
P2
P4
P6
P11
P15
DTUs
125
250
500
1000
1750
4000
Size in GB
500
500
500
500
4000
4000
Azure gives us the flexibility to easily move from lower service tier to higher service Tiers and from higher service tier to lower service tier at any point of time. Duration of the change in service tier will depend upon the database size. Change in the charges will only comes into effect once the change in the service tier got completed.
In Addition, Azure billed single database on the hourly basis based on the highest Service tier used in that hour.
Please Note– If you upgrade database to over 1 TB storage option, you will not be able to downgrade this database to 1 TB or below or to a performance tier below a P11. You will not be able to add this database to an elastic pool. Using restore, copy, or geo-replication will require over 1 TB storage option with a P11 or P15 performance tier.
DTU Calculator
After we got understanding about the DTUs and Service tiers, next question comes how do we know the number of DTUs needed when we migrate our SQL database to the Azure because it will finally going to help in choosing the correct Service tire. To help us, we have a DTU Calculator at http://dtucalculator.azurewebsites.net . This DTU Calculator has been developed by Justin Henriksen, Azure Solution Architect at Microsoft.
How DTU Calculator work: –
DTU Calculator Work Flow
As you have seen in the above work flow, to know the most accurate resource utilization of our database, we first need to capture below mentioned utilization metrics on our SQL Server. For capturing the correct performance metrics, we can use one of the utilities, Command Line EXE or PowerShell Script. These utilities can be downloaded from the DTU Calculator website. We need to capture representative workload for getting the best result which may require to run this utilities to at least some hours to few days.
Processor – % Processor Time
Logical Disk – Disk Reads/sec
Logical Disk – Disk Writes/sec
Database – Log Bytes Flushed/sec
when we download the Command Line Utility and unzip it, we got below mentioned 2 files: –
Command Line Utility files
Now if you open the config fie SqlDtuPerfmon.exe, you may need to take care of the below highlighted sections and change its value accordingly to your needs.
Config fie – SqlDtuPerfmon.exe
1) In the first highlighted section with key as “SqlCategory”, if you don’t change the value and execute the Utility as it is, it will work if your SQL server instance is the default one. If your SQL Server instance is the named instance then you need to change its Value. Also this utility work at the SQL instance level not at the database level. For specific SQL database, you need to use the other DMVs for Capturing this data.
For example, suppose my SQL instance name is DEV2K16 then, the value as shown below
2) In the second highlighted section, Value 3600 represents the number of seconds this utility will going to run for capturing the representative workload. By default it is 1 hour or 3600 Seconds. You can increase the value as per your requirement. But make sure that it ran for enough duration to capture the correct representative workload.
3) In the third highlighted section, value represents the location in the server where the CSV file containing the trace output going to save. Make sure the user has the required permission for writing the file in this location or you can change it to some other location.
Instructions on executing the utility file has been mentioned in the DTUcalculator website. Please see below screenshot containing these instruction, taken from the website http://dtucalculator.azurewebsites.net. You
Instruction for executing Utility files
When you execute the utility, you can see the output data in the command shell as shown below: –
Output data of executing Utility Files
Once you the Utility execution got completed, you need to upload the CSV file into the DTU Calculator website and click on the Calculate button.
After the analyzing the performance traces, the DTU Calculator gives the result as shown in the below mentioned screenshots
Service Tier/Performance Level
In the above screenshot, DTU calculator gives the general recommendation about the Service Tier. It is an interactive chart where you can move the mouse on its various section and see how much percentage a selected Service tier can cover. Here, when I move my cursor to S2 section, it shows that it will going to cover 96.97% of my workload.
DTUs Over Time
If we scroll down, we see the above chart, where mostly DTUs are under 50 but there are some DTUs which are touching 125 mark. Here I run the utility for few minutes only for demo purpose. Due to this the Time values has the range of 0-1100 instead of 0-3600.
Below the chart, there is a link View More details. If we click on this link, it shows Service tier recommendation for different resources like CPU, Iops & Log as shown in below screenshots. All these charts are interactive where we can mouse over to different service tier sections and see how much utilization of resource this tier is going to cover
Service Tier/Performance Level for Cpu, Iops, & Log
As you seen in the above screenshot, you can move your mouse over on the chart to find out which Service Tier will cover most of the requirements. Here if we mouse over to Standard-S2, we see that this Service Tier/Performance Level cover most of the requirement as 98.75 % of CPU, 98.04 % of Iops, and 100.00 % of Log utilization.
Conclusion: –
In previous article on Azure series, we talk about Azure in general and brief introduction of Service Tiers. In this article, we learns that are the 2 types of Price models Azure offers to its customers.
DTUs Based Price model
vCore Based Price model (Under Preview)
In this article, we discuss the DTUs Based Price model in details along with different Service tiers which comes under this price model. This article also gives information about the values levels of the Standard Service Tier & Premium Service Tier. Also this article gives the information about the resources Azure offers in these service tiers and their impact on the application performance.
After that we discuss what is DTU and how we can get the initial estimate of required DTUs to start with using the DTU Calculator. In addition to this we also got the information about how this DTU calculator work and how it gives the estimation of service tier we can use to start with.
In the next articles under the Azure series, we are going to explore more topics of Azure like Database migration from SQL Server to Azure, Security features etc. We can see all these Azure articles under the Azure page. Please don’t forget to gives your valuable comments for the article or you can send me the direct queries to my Email id askvivekjohari@gmail.com
Sometimes we need a SQL Script which can give the below information about the databases created on a SQL Server for house keeping purpose: -1) Database Name
2) Database ID
3) Database Files name with their physical location
4) Database Creation Time
5) Users access type for Database
6) Database recovery model
7) Database State (ON/OFF)
8) Database Collation
9) File size on the Disk
Following SQL Query will help you in finding the above mentioned information for all databases on a SQL Server
SELECT
sd.[Name] AS [database Name]
,sd.database_id [Database Id]
,mf.name as [File Logical Name]
,case
when type_desc = ‘LOG’ then ‘Log File’
when type_desc = ‘ROWS’ then ‘Data File’
Else type_desc
end as [File type]
,mf.physical_name [Physical Location]
,sd.create_date [Database Creation date]
,sd.collation_name [collation name]
,sd.user_access_desc [User Access Type]
,sd.recovery_model_desc [Database Recovery Model]
,sd.state_desc [Database State]
,size_on_disk_bytes [File Size in bytes]
,size_on_disk_bytes/ 1024 as [File Size in KB]
,size_on_disk_bytes/ 1024 / 1024 as [File Size in MB]
FROM sys.dm_io_virtual_file_stats(NULL, NULL) AS fs
inner join sys.databases sd on fs.database_id=sd.database_id
JOIN sys.master_files AS mf ON mf.database_id = fs.database_id
AND mf.file_id = fs.file_id
ORDER BY sd.database_id
I hope that above query will be helpful to you. Don’t forget to give your valuable comments on this article. Also you can send me your valuable feedback on my email id askvivekjohari@gmail.com
Sometime we need to find out the history of database restoration to get the answers of following questions: -1) Do we need to restore the database again as there is a possibility that it is restored recently?
2) Which backup file (with location information) is used for database restoration?
3) Name of the source database whose backup file is used database restoration?
4) When database backup file is created ?
5) Which user perform the database restoration activity?Below query can be used for finding the database restoration history
SELECT [r].[destination_database_name] as [Database Name],
[r].[restore_date] [Restore Date],
[r].user_name as [User],
(cast([b].software_major_version as varchar(10))+’.’ +
cast([b].software_minor_version as varchar(10)) +’.’+
cast([b].software_build_version as varchar(10))) as [Server version],
[b].compressed_backup_size as [Backup file Size],
[b].[backup_start_date] [Backup Start Time],
[b].[backup_finish_date][Backup End Time],
[b].[database_name] as [Source Database Name],
[bkpmf].[physical_device_name] as [Backup File Used For Database Restore]
FROM msdb..restorehistory r
INNER JOIN msdb..backupset b
ON [r].[backup_set_id] = [b].[backup_set_id]
INNER JOIN msdb..backupmediafamily bkpmf
ON [b].[media_set_id] = [bkpmf].[media_set_id]
ORDER BY [r].[restore_date] DESC
For example, suppose we created a database name as “Sampledatabase” which is never restored. Then if we execute the above query we got no restoration history of this database:-
Now we take backup of this database
and restore the “Sampledatabase” with the backup taken in the above step.
If we again execute the SQL Script to get database restoration history, we got the following result
Now if we take another backup with the different name as “SampleDatabase_1.bak” on the same location and tried to restore the database again, then one more entry for the Sampledatbase will come on the execution of the SQL query for getting Database restoration history as shown in below images
If we see the outcome of the query, we also got the version of the SQL server on which database backup file was created & the size of the backup file. Sometime these additional information can become handy.
I hope database guy will get help from this query. Please send me your valuable feedback on askvivekjohari@gmail.com. Thanks for visiting my blog.
Sometime we create databases on Test/ Development database servers for temporary uses for short duration and forgot to delete them after the work got completed. As a part of house keeping activity, we need to find out when a database is last accessed in order to find out the databases which are not used since long time and can be a deleted.
Below mentioned SQL query will going to help you in finding out the last access date of all the databases of a SQL server
SELECT name as [Database Name], [Last Access Date] =(select MAX(temp.lastaccess)
In this first article Azure SQL Database – Introduction of the series Understanding Azure SQL Database I am going to publish the Azure SQL Database concepts. After this series, you will have the good understanding of the following Azure SQL concepts
What is Azure and Azure SQL Database
Pricing Model of Azure SQL
Creating SQL Server & Database on Azure and how to connect them
Understanding of different Azure Service Tier
Difference between Azure SQL Database & SQL Server
Security features in Azure SQL Database
Database Transaction Units (DTU) & how to calculate it.
Elastic Pool in Azure SQL Database
Database Backup & Restoration in Azure SQL Database
High Availability & Disaster Recovery feature in Azure SQL Database
Database Migration from SQL Server to Azure SQL database
Database Migration from Azure SQL Database to SQL Server
Azure Metric Alerts and how to create them
Performance Tuning in Azure SQL Database
When we think of Azure SQL Database, first question comes in our mind is what is Azure? Microsoft Azure is a cloud computing platform created by Microsoft to build, test, deploy and host the applications using the global network of Microsoft managed data centers.
Next question comes, what is Azure SQL Database? Azure SQL database is defined as the Database as a Service offered on Microsoft Azure. By Database as a Service means that Microsoft as the service provider will going to manage the database software, taken care of Database backup, recovery, High Availability, Operating System. We as users only need to taken care of database and the queries running inside the database. Also we need to pay as per our current database uses and nothing to pay anything upfront. Also we can scale up or scale down or create or destroy the environment as per our requirement without any interference from the provider Microsoft.
Azure provides three Service tiers for setting up the SQL Database. These 3 Service Tiers are:-
1) Basic Service Tier 2) Standard Service Tier 3) Premium Service Tier
Within Standard & Premium Service tiers we have different level. For example in Standard Service tier we have 4 levels S0 , S1, S2 & S3. In Premium Service tier, we have 6 levels P1, P2, P4, P6, P11 & P15.
Azure SQL Database Backup Retention time period, Performance, Database Size are depend on which Service Tier we choose at the time of database creation. We can change the service tier or service tier level any time as per application requirement. We will going to know more about Service tiers in the coming articles in this series.
Pricing of Azure SQL database is calculated on the hourly bases and it depends upon which Service tier we have used. The hourly rate is determine on the basis of highest Service tier we used in that hour.
In case of SQL Server hosted in a VM, users are responsible for maintaining the operating system, taking regular database backups, database disaster recovery planning, maintaining the SQL Server, SQL performance & Security. But in case of case of Azure SQL database, we just need to choose the correct Service Tier as Azure itself responsible of taking care of operating system, Backups, High Availability & Security.
There are many features of Azure SQL database, which we are going to cover in the upcoming next articles of this series. Till then keep learning and keep visiting this site. Don’t forget to send your valuable feedback as comment or you can send to my mail id askvivekjohari@gmail.com
Problem
Sometimes users may have numerous of databases in their SQL Server. However, while managing their database sometimes by mistake their records are deleted due to which they face a lot of issues. To maintain the workflow they need to recover deleted records from SQL Server 2014. This could be possible only with successful SQL LOG Recovery
How to Get Back Deleted Records in SQL Server: Solution
Mainly Transaction log is responsible for all database-logging activities. Similarly, in this discussion, we will utilize the usage of similar undocumented function “fn_dblog” to get any unauthorized deletion of data as well as to retrieve deleted data in SQL server.
If you are aware that when your data is removed then, you can easily solve your problem on how to recover deleted data in SQL server database. However, if you do not know the data as well as the time when the data is erased then, it is important to understand first who has deleted the data. In this segment, we will first find the particular LSN under which deleted statement is run after that we will rollback deleted records in SQL until that LSN.
Each record in MS SQL Server transaction log is distinctively recognized by LSN (Log Sequence Number). LSN of log record at which particular event happened can be beneficial for making precise restore sequences and to retrieve deleted data. LSNs are utilized internally at the time of RESTORE sequence to path the point in time at which the data has been reinstated. When data backup is restored, data is reinstated to LSN corresponding to point in time at which backup was taken. Differential, as well as log backups, advance restored the database to later time that corresponds to higher LSN. Important: Do not do any modifications in production without testing it properly in lower-life cycle environments
Recover Deleted Records from SQL Server with LSN
Follow these steps to recover deleted records in SQL Server with successful SQL Log Recovery: Step 1
Before moving further, we will make the database as well as the table on which one will run DELETE statement. Then, we will get the data deletion and then rollback deleted records in SQL. Implement the T-SQL code given below to generate database and table and retrieve deleted data.
Step 2
We have made a database with table ‘Location’ of three columns. Now, we will put few rows in table.
Step 3
We will go further to erase some rows and recover deleted records from SQL Server table by using LSNs from the SQL Server Transaction Log.
Step 4
Now, find the SQL Server Transaction Log and retrieve deleted records in SQL. Run the mentioned code below to get data information about all removed transactions with SQL Log recovery.
You can see the transaction IDs under which DELETE statement was executed. As we know that data is removed from Location table, we will focus on only those transaction IDs under which data is erased from location table to retrieve deleted data. We can get table name from “AllocUnitName” column. It states DELETE statement has been executed on HEAP table ‘dbo.Location’ under transaction ID 0000:0000055e. There is only one transaction ID under which we can view deleted records SQL Server, which means this action has been implemented in a single batch. Now, capture transaction ID from next command. Step 5
We initiate that transaction ID from above script that we will utilize in below statement to find the LSN of LOP_BEGIN_XACT operation and recover deleted records from SQL Server. It means that we want an exact LSN when DELETE statement started its transaction to retrieve deleted data. Step 6
We will utilize STOPBEFOREMARK operation to get back deleted records in SQL Server. We cannot utilize this hexadecimal value to implement the operation of STOPBEFOREMARK. Therefore, we want alteration this value into decimal format. Then put all these together as single number. Step 7
Now implement transaction log backup on database where data was removed if transaction log backup has not competed since data deletion. Then, we will restore the database to other location or on a similar server with the variant name until above LSN. Then, we will import and recover deleted data in SQL Server from newly reinstated database to production database. Step 8
Now, the database is restored, One can check whether you could recover and find deleted records SQL Server or not. Execute the below SELECT statement to preview the first ten rows of location table that was deleted and then retrieve deleted data.
Now you know how to retrieve deleted records in SQL Server with SQL Log Recovery. You can utilize this erased data as per your need. If you need to export this data to live database you can utilize the SQL Server Integration Services, i.e. import and export wizard.
SQL Log Recovery become Hard
Above steps can be useful in most of the cases. But several situation may occur when it becomes difficult to restore deleted data with SQL Log recovery. Lets take a look on these situation:
Changes made after the DELETE, TRUNCATE or DROP statments
Unable to take the SQL Server offline
New Transactions performed after the data was lost
No, recent Full Database backup available.
In such situation user can go with third party SQL Log Recovery to successfully restore deleted data records in SQL Server.
Conclusion
After understanding, the users problem how to recover deleted records from SQL Server 2014. In the above discussion, we have discussed the ways to retrieve deleted data from the SQL Server database by Successful SQL LOG Recovery that makes easy for users in restoring SQL Server deleted records in SQL version 2016 / 2014/ 2012 / 2008r2 / 2005 / 2002 and all below version.
Introduction
In todays decade Relational database Management system became the necessity of the organizations whether they are small level or large level. In such context SQL Server is the best and successful RDBMS which provides highly integrated services to manipulate the SQL database over the Server. As we talk about the SQL Server database the Server provides the primary storage call MDF File, NDF file also known as secondary file, LDF log transaction file. Well, in this section we will discuss about how to restore LDF and MDF files to a database so lets make some prerequisites perform tasks without any trouble.
First of all detach the database. If you are trying to attach the database which is not detach you will get an error
Maintain MDF File and LDF file in a specific folder before going to attach
Locate MDF File and LDF File in the same location
There are two ways to restore database from MDF file in SQL Server:
With the help of SQL Server Management Studio
Using T-SQL
1. Through SQL Server Management Studio follow some steps:
Open SSMS and go to object explorer of the database engine instance
Then make a right click on the database and select Attach option of the list button
Windows appers, then click on Add button
Select the .mdf file and click on OK Button
Validate the selected files and go to OK Button
Now check the attached database 2. On using T-SQL
Login to SQL Server database engine
Go to New Query Window and use Create database with Attach close
    CREATE DATABASE MyDatabase
    ON (FILENAME = 'C:SQLServerMyDatabase_Data.mdf'),
    (FILENAME = 'C:SQLServer MyDatabase _Log.ldf')
    FOR ATTACH;
Conclusion
In the above section, we learned how to restore LDF and MDF files to a database. It is highly recommended that you have to detach the MDF file before attaching a new one. This is a very helpful method to restore database from MDF file in SQL Server. The second method performs same task using T- SQL, for the users who needs to attach MDF file through SQL script. In case, if the transaction log file is missing then you can still attach MDF file in SQL Server without LDF file and if the MDF file is not accessible or corrupted then you can repair MDF file using third party SQL Recovery tools.