Migrating SQL Database to Azure SQL Database using SSMS Export/Import
Contents
- Introduction
- Creating the .bacpac file using SSMS Export
- Importing the .bacpac file using SSMS Import
- Summary
Introduction
There are many ways of migrating the On premise SQL Database to Azure SQL Database. In the previous article on migrating SQL Database to Azure SQL Database, we discuss the SSMS deploy method as a step by step process. This article will tell how to migrate SQL Database to Azure SQL Database using SSMS Export/Import data as a step by step process. It is a multi steps process where in first step we need to export the data into a BACPAC (.bacpac ) and then in next step, import that BACPAC file. It means even if the import data step is failed, we doesn’t need to repeat the data export process again. As we have have the exported BACPAC file, we just need to restart the Import process. This process require longer downtime. So this process is suitable for larger databases if the downtime duration is acceptable.
Migrating SQL Database to Azure SQL Database using SSMS Export data
Creating the .bacpac file using SSMS Export
As a first step, we need to create the .bacpac file of the On premise SQL database which we want to migrate to the Azure SQL Server. So connect to the On premise database server and select the SQL database to migrate. Right click on it and select the option Export Data-tier Application.. (as shown in the below screenshot)

Once the option Export Data-tier Application.. clicked, it will open the Export Data-Tier Application page as shown in the below screenshot.

Click on Next button to reach the Export Setting screen. In this screen, we need to select the location for storing the .bacpac file.

Click on the Next button to reach the Summary Page. In this screen, we need to recheck the setting which we have specified.

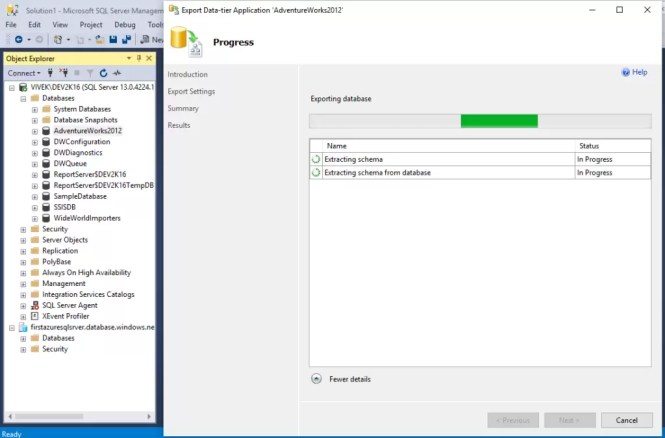
After verifying the specified settings, click on the Finish button. It will start the process of .bacpac file creation as shown below.

Once this operation got completed, below screen comes. Click on the Close button. This will complete the database export part of this migration process.

Importing the .bacpac file using SSMS Import
After creating the .bacpac file by exporting the data, we need to import it into the Azure SQL Database. For this, first connect with the Azure SQL Server through SSMS. Then right-click on the Databases node and choose Import Data-Tier Application..

It will open the below Import Data-Tier Application.. page as shown below.

Click Next button. It will open the Import Settings page. In this page we need to specify the .bacpac file location for import.

Click Next to reach database setting page. Here we need to specify the Azure SQL Server Name, New Azure SQL Database name & the service tier based on the database size and other requirement as shown in the below screenshot

We can change the default Microsoft Azure SQL Database settings as per your requirement. For example, I have changed the Edition of Microsoft Azure SQL Database, Maximum database size (GB) and Service Objective for my database as shown in the below screenshot.

Once all database settings defined, click on the Next button. It will bring up the Summary page as shown below.

Once settings verified, click on the Finish Button. It will start the Import process as shown in below screenshot.

Once the Importing database process completed successfully, it will bring up the Result page. Click on the Close button.

Database is successfully imported to the Azure SQL Database. We can it verify by connecting the Azure SQL Database using the SQL Server Management Studio and then expanding the Database node. Database will be visible and it is available for SQL queries as shown in the below screenshot.

Summary
This article is the part of the series Migrating SQL databases to Azure SQL Database. In the last article in this series, we discussed SSMS deploy method for migrating the SQL Database to Azure. In this article we discussed how to migrate SQL Database to Azure SQL Database using SSMS Export/Import data as a step by step process. Unlike SSMS deploy method, which is a single step process and suitable for smaller database, it is a multi step process and suitable for large database but with longer downtime required. In the next article, we will going to discuss the migration of SQL database to Azure SQL Database using the Microsoft database migration assistant (DMA) tool.
Please don’t forget to gives your valuable comments for the article or you can send me the direct queries to my Email id askvivekjohari@gmail.com. If you want you can also join our Facebook community here or follow me on Twitter
Read More
Migrating SQL Database to Azure SQL Database using SSMS Deploy
Understanding Azure SQL Database- Introduction
Azure Pricing Models and Service Tiers
Azure – Creating an Azure SQL Database
How to connect with Azure SQL Database
Read more from Tutorials
Discover more from Technology with Vivek Johari
Subscribe to get the latest posts sent to your email.


Thank you for sharing
This is very useful for us. we Vegus168 appriciate what you do. keep going!
Apply for vegus168 simply by adding Line ID: @ vegus168s
Good morning. Introducing my homepage. This is a live casino site where you can enjoy various games such as Blackjack, Toto, Powerball, Poker, Baccarat, and Speed Game. Click the link and you’ll be taken directly. 모바일바카라