How to connect with Azure SQL Database

Introduction
In the previous article Azure – Creating an Azure SQL Database, we discussed, how to create an Azure SQL Database. Now in this article, we will discuss about how to connect with Azure SQL database using SQL Server Management Studio (SSMS). The below screenshot shows the overview page of the SQL database AzureSQLDB which we have created in our last post.

In this database overview page, you can see the field Server Name. This field information contains the connection string which we are going to use for connecting this database using SSMS. There is a copy icon which user can click to copy the server connection string as shown in the below screenshot.

Once Azure SQL Database connection string is copied, open the SQL Server Management Studio (SSMS) and in the server name field, paste it. Window authentication is not allowed in case of Azure SQL database. So we use the SQL authentication for connecting to Azure database in this article. In the Authentication field, choose SQL Server Authentication and in the login field, use the login of the Azure SQL Server Admin which we created while creating the Azure SQL Server in our last article. After that enter the password of the Azure SQL Server Admin.

In case of on premise SQL Server, we can connect to the SQL Server after clicking on the Connect button of the SSMS connection page. But in case of Azure SQL Server, we need to add IP Address in the firewall rule which allow us to connect to the Azure server. In this screen, we need to first sign in using the azure account credential as shown in next 3 screenshots.

Enter the email of Azure Account

Enter the password of your Azure account

After signing into the Azure account, we need to add either a current IP address for accessing the Azure SQL Server or we can add a range of IP Address which can have access to the Azure SQL Server as shown in next 2 screenshots. Azure helps by picking the current IP address or range of the IP address of the machine using which user try to login into the Azure SQL Server.


Once user select the IP address option, it needs to click Ok and then click on Connect button. It will connect the user with the Azure SQL Server through SSMS as shown in below screenshot.

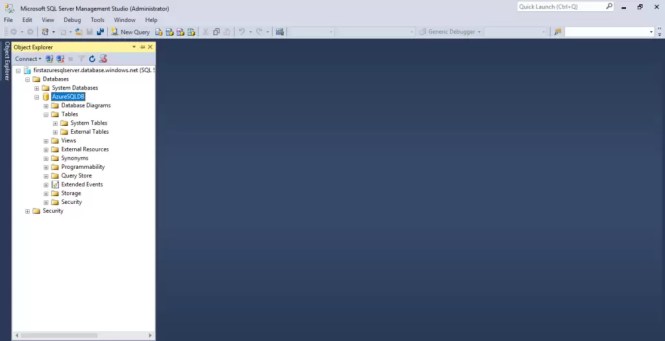
Once user connect to the Azure SQL Server using SSMS, it can see all the databases by clicking on the “+” icon against the Databases. By clicking on the + icon against the databases, we can see our database AzureSQLDB. It is highlighted in yellow color in the below screenshot.
Since AzureSQLDB is a blank database, so if we click on the “+” icon against the Tables, no user table will be found. This can be see in the below screenshot.

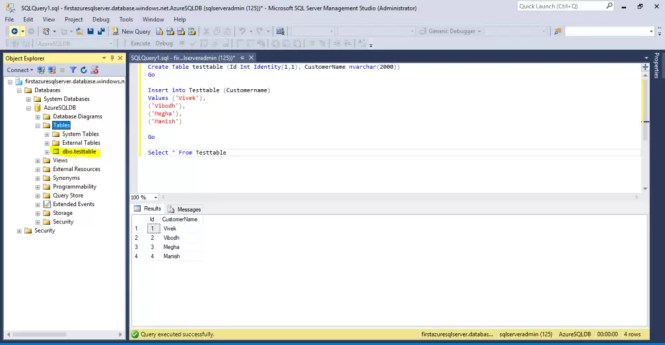
We can execute the SQL queries against the Azure SQL database as we do in case of On Premise SQL Server database. For example, let select the database AzureSQLDB and click on the New Query option from the top menu. After that create a new table “testtable” on it & insert the data into the table using the Insert command. Now after inserting if we select the data from table, we got the record-set of the table as shown in the below screenshot.

If we again refresh the Tables node in the left hand side hierarchy, we can see the new table TestTable as highlighted in the below screenshot.

Summary
In the previous article we learn how to create a SQL Database on Azure Portal. In this article we gives the Step by Step details of how to connect with Azure SQL Database. Images has been added at every step to make understanding of the concept easy and in a better way. In the next articles, we will discuss the differences between the On Premise SQL Server & Azure SQL Server. Also we will going to discuss different ways of migrating the SQL databases from the On Premise SQL Server to Azure portal.
Please don’t forget to gives your valuable comments for the article or you can send me the direct queries to my Email id askvivekjohari@gmail.com.
Read More
Understanding Azure SQL Database- Introduction
Azure Pricing Models and Service Tiers
Azure – Creating an Azure SQL Database
Discover more from Technology with Vivek Johari
Subscribe to get the latest posts sent to your email.


